
# How to Clean a Dog’s Ears the Right Way: A Step-by-Step Guide for Every Owner
Author: PurePalsLab Research Team
Reviewed by: Veterinary advisory panel
Reading time: 10 minutes
—
There is a version of ear cleaning that everyone assumes is simple, and there is the version that actually keeps ears healthy. Most owners, when they think about washing a dog’s ears at all, picture a cotton swab and a quick wipe. That picture is wrong in two important ways, and getting it right is the difference between ears that stay clean and ears that end up more irritated than before.
Here is what this guide covers. Why ear cleaning matters more for some dogs than others, what you actually need, the exact step-by-step way to do it without hurting your dog, how often to clean, and the moments when you should absolutely put the bottle down and call a vet instead. Because the most important lesson in ear care is knowing when not to clean, and that is the part most people learn the hard way.
—
The Short Answer
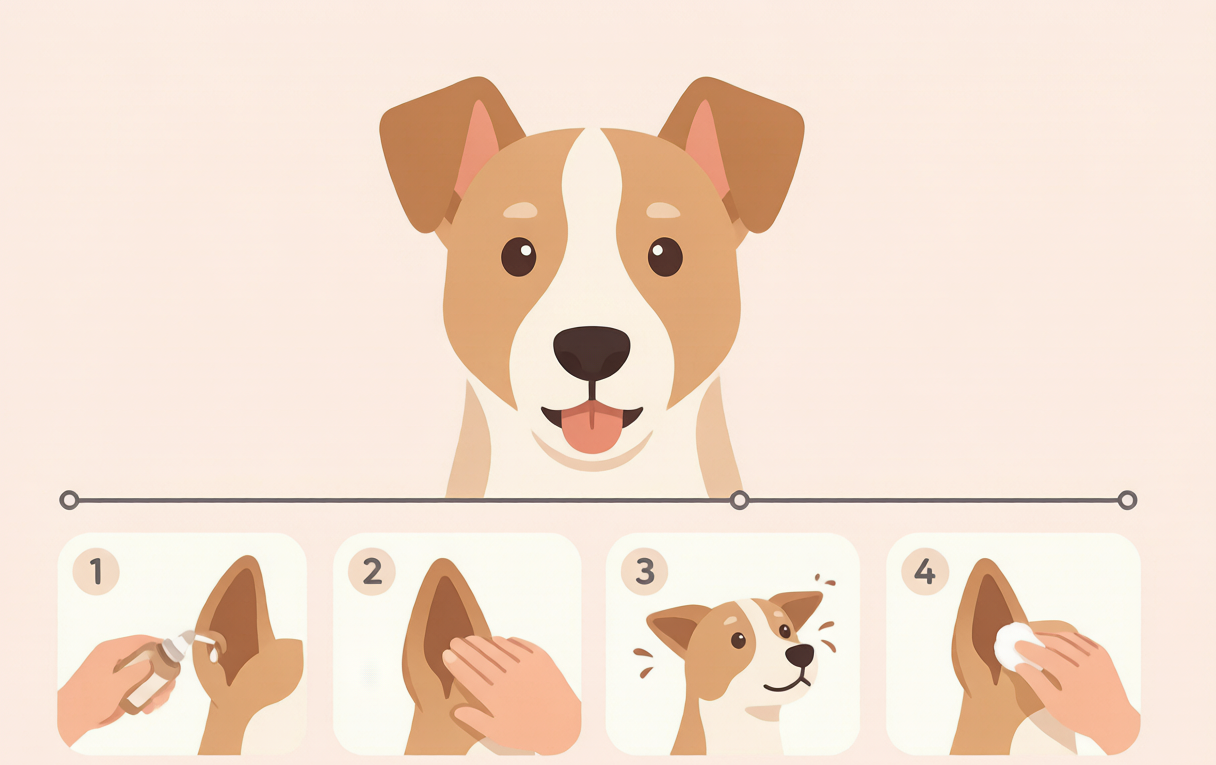
To clean a dog’s ears safely, you use a vet-approved ear cleaning solution, not water or alcohol. Squeeze a small amount into the ear canal, gently massage the base of the ear for about 30 seconds, let your dog shake their head to loosen debris, then wipe the visible outer ear with a cotton ball or soft cloth. Never push anything into the ear canal, especially cotton swabs. Dogs with floppy ears, dogs that swim, and dogs prone to allergies need cleaning more often, typically every one to two weeks or as your vet advises. And if the ear is painful, red, swollen, has a bad smell, or has discharge, stop and see a vet, because cleaning an infected ear can push the problem deeper.
—
Why Cleaning Ears Matters (and Why It Doesn't for Every Dog)
A dog’s ear canal is shaped differently from a human’s. It runs down and then makes a sharp L-shaped turn, which means the anatomy is different from ours. This shape does two things. It helps protect the eardrum, but it also means the canal stays warmer and more humid than the outside air, and debris can settle in the bottom of that L where it is hard to reach.
That warm, humid environment is exactly what yeast and bacteria like. For most dogs, a healthy immune system and normal ear wax keep things balanced, and they may never need active cleaning. But certain dogs are more prone to problems, and for them, regular gentle cleaning is genuinely preventive.
The dogs who benefit most are those with floppy ears, like cocker spaniels, basset hounds, and labs with heavy ear flaps, because those ears trap heat and moisture. Dogs who swim a lot also need more attention, since water sitting in the ear sets up the perfect conditions for an infection. And dogs with allergies, especially seasonal or food allergies, tend to have more ear issues, because the inflammation in the skin can extend into the ears.
If your dog has never had an ear problem and has normal, dry, upright ears, you may not need to clean them at all, and that is fine. Routine cleaning is about preventing problems in the dogs who are prone to them, not about scrubbing every dog on a schedule.
—
What You Need (and What You Should Never Use)
Having the right supplies makes the job easier and safer. Here is the short list.
A vet-approved ear cleaning solution. This is the single most important item. Look for a solution made specifically for dog ears, not water and not human ear drops. Many good solutions help dissolve wax and dry the canal afterward, which discourages yeast growth. Your vet can recommend one, and many are available at pet stores.
Cotton balls or a soft cloth. These are for cleaning the visible outer part of the ear after you let your dog shake. They are safe because they are too big to push into the canal.
A towel. Because your dog will shake, and that shake sprays solution and debris everywhere. A towel under the chin and over your lap saves your clothes and your walls.
Treats. Lots of treats, for making the experience positive.
What you should never use: cotton swabs (Q-tips), which push wax and debris deeper and can damage the eardrum; alcohol, which stings and dries the sensitive skin; hydrogen peroxide, which can irritate the ear; and any human ear product, which is not formulated for a dog’s ear. If a product is not made for dog ears, leave it on the shelf.
—
The Step-by-Step Cleaning Routine
Here is the routine that works, done in a calm, gentle way. If your dog is nervous, go slow, use treats, and keep sessions short at first.
Step 1: Set up and get comfortable. Hold your dog gently, or have someone hold them if that helps. Fill the ear with solution by holding the bottle at the opening of the ear canal and squeezing in enough to fill it, usually a small squirt. Do not jam the tip into the ear, just hold it at the opening.
Step 2: Massage the base of the ear. With your dog’s ear flap lifted, place your fingers at the base of the ear where it meets the head, and massage gently for about 30 seconds. You should hear a soft squishing sound, which is the solution working on the wax. This massage loosens debris in the canal.
Step 3: Let your dog shake. Step back and let your dog shake their head. This is important, because the shaking action helps bring debris up and out of that L-shaped canal, which is the whole point. Be ready with the towel.
Step 4: Wipe the visible ear. Using a cotton ball or soft cloth, gently wipe the inside of the ear flap and the visible part of the outer ear to remove the loosened wax and solution. Use a fresh cotton ball for each wipe, and never push anything into the ear canal itself.
Step 5: Repeat on the other ear, then reward. Do the same on the other ear, then give your dog a treat and plenty of praise so they associate the experience with something positive.
That is the whole routine, and it takes a few minutes once you get the hang of it. The key points to remember are massage, let them shake, and wipe only the visible part. That combination does the cleaning safely.
—
How Often Should You Clean a Dog's Ears?
There is no single answer, because it depends on the dog. The right frequency is really “as often as your vet recommends for your particular dog,” but here is a useful starting guide.
| Type of dog | Typical frequency |
|---|---|
| Normal, healthy ears, no history of problems | Rarely or only when visibly dirty |
| Floppy-eared breed (cocker, basset, lab) | Every 1-2 weeks |
| Swimmer or dog that gets water in ears often | After each swim, plus weekly if prone to issues |
| Dog with a history of ear infections or allergies | As your vet directs, often weekly or bi-weekly |
The goal is to keep the ears clean without over-cleaning, because washing too often can strip the ear of its natural protective oils and dry out the skin, which can actually invite problems. If you are not sure, your vet is the best guide, and a quick question at a checkup answers it.
—
When to Stop Cleaning and See a Vet
This is the part that protects your dog, so pay attention. Never clean an ear that is showing signs of infection or injury. Cleaning a painful or infected ear can push debris and bacteria deeper and make things much worse. Stop and see a vet if your dog has any of these:
- Pain or sensitivity when you touch the ear, or flinching, yelping, or pulling away when you try to clean it.
- Redness, swelling, or heat in the ear.
- A bad smell, which can signal a yeast or bacterial infection.
- Discharge, whether it is dark, yellow, green, or bloody.
- Excessive scratching, head shaking, or tilting the head.
- Any sign your dog is losing balance or acting dizzy.
If you notice any of these, put the solution away and call your vet. These point to an ear infection, which is best treated by a professional who can look inside the ear with an otoscope and prescribe the right care. Our dog ear infection guide and ear mites guide cover the signs and what to expect at the vet if that is what you are dealing with. Cleaning is for healthy ears; treating is a job for a vet.
—
Preventing Ear Problems in the First Place
A little prevention goes a long way, especially for dogs prone to ear trouble. Here is what helps.
Dry the ears after water. If your dog swims or gets baths, dry the ears gently with a cotton ball or soft cloth afterward. Water sitting in the canal is one of the biggest risk factors for infection, so getting it out matters.
Keep the fur around the ears trimmed. In dogs with lots of hair around the ear opening, trimming keeps the area drier and reduces trapped moisture and debris.
Address the underlying causes. Many ear problems are a symptom, not the root issue. Allergies, for example, drive a lot of ear inflammation, and managing the allergy helps the ears. A healthy skin and coat, supported by good nutrition and fatty acids, helps too. The EPA and DHA in our Omega 3-6-9 Complete Fatty Acid Complex support skin barrier health, which can help support healthy skin overall, and our 12 Billion CFU Multi-Strain Probiotic supports gut health, which is connected to skin health. These are support steps for a healthy baseline, not a treatment for an ear infection, and they work best alongside your vet’s guidance.
Know your dog’s normal. Every dog’s ears look a little different. Once you know what your dog’s healthy ear looks and smells like, you are far more likely to notice when something changes, and catching a problem early is always easier than treating it late.
—
Frequently Asked Questions
How often should I clean my dog’s ears?
It depends on the dog. Normal, healthy ears may rarely need cleaning, while floppy-eared breeds, swimmers, and dogs with a history of ear problems often need it every one to two weeks. The best guide is your vet, who can look at your dog’s ears and recommend a frequency. Avoid over-cleaning, which can dry out and irritate the ear.
Can I use cotton swabs or Q-tips to clean my dog’s ears?
No. Cotton swabs push wax and debris deeper into the ear canal and can damage the eardrum. Only wipe the visible outer part of the ear with a cotton ball or soft cloth. The cleaning solution and your dog’s natural head shaking handle the deeper canal, so swabs are not needed and are actually risky.
What can I use to clean my dog’s ears at home?
Use a vet-approved ear cleaning solution made for dogs, applied with the massage-and-shake method, and wipe the visible ear with a cotton ball or soft cloth. Never use water, alcohol, hydrogen peroxide, or human ear products, which can irritate or damage the ear.
How do I know if my dog’s ear is infected and needs a vet?
See a vet if the ear is painful, red, swollen, has a bad smell, or has discharge, or if your dog is scratching, shaking its head, or tilting its head. Never clean an infected ear at home, because that can push the problem deeper. A vet can examine the ear and prescribe the right treatment. —
Bottom Line
Cleaning a dog’s ears is simple once you know the right way, and it is genuinely preventive for the dogs who need it. Use a vet-approved solution, massage the base, let your dog shake, and wipe only the visible ear with a cotton ball. Never use swabs or harsh products, and match the frequency to your dog, with floppy-eared and swimming dogs needing more attention. The most important rule is knowing when to stop, because a painful, red, or smelly ear is not a cleaning job, it is a vet visit. When you get those basics right, ear care becomes a quick, low-stress part of the routine that keeps your dog comfortable and healthy.
And if your dog already has signs of an ear infection, skip the home cleaning and let a vet take a look. That is the difference between preventing a problem and making one worse.
—
References
- American Veterinary Medical Association (AVMA) — Canine ear health and care resources. avma.org
- Cummings School of Veterinary Medicine, Tufts University — Canine dermatology and ear health resources. vetmed.tufts.edu
- American Kennel Club (AKC) — Canine ear care guidance for pet owners. akc.org
—
Disclaimer: This article is for informational purposes only and is not a substitute for professional veterinary advice, diagnosis, or treatment. These statements have not been evaluated by the FDA. This product is not intended to diagnose, treat, cure, or prevent any disease. Always consult a licensed veterinarian for any health concern regarding your pet.